Recent posts

Mind, Body & Soul
Do Not Whistle at Night: South Africas Strangest Superstitions
26 April 2025

Geek Chic
How to Replace A Broken Lenovo Laptop Screen
24 April 2025

Money Talks
Everything You Need to Know About SASSA Status Check
13 April 2025

Mind, Body & Soul
The Genetic Diversity of Cannabis Seeds
12 April 2025
Popular posts
Extravaganza
Trending Music Hashtags To Get Your Posts Noticed
24 August 2018
Geek Chic
How To Fix iPhone/iPad Only Charging In Certain Positions
05 July 2020
Extravaganza
Trending Wedding Hashtags To Get Your Posts Noticed
18 September 2018
Money Talks
How To Find Coupons & Vouchers Online In South Africa
28 March 2019
How To Track HubSpot Forms Using GTM
03 July 2024 | 0 comments | Posted by Che Kohler in nichemarket Advice
HubSpot forms are a powerful tool for capturing leads and nurturing relationships. We use it as our preferred CRM and lead nurturing platform here at nichemarket; while we prefer to keep our site integration separate from HubSpot and only mark up our existing tracking form to feed data to HubSpot, we do know others prefer to have a HubSpot native form embedded on their website.
If you're committing to HubSpot, it makes sense to feed leads directly into your preferred tool. However, with convenience comes some quirks. You'll likely find that your GA4 auto event won't pick up HubSpot form submissions, while GTM isn't exactly helpful if you're only using built-in event tracking.
While it's not a complete train smash since HubSpot does have source attribution tracking of its own, If you are reporting from GA4, you'll want that event firing to your account.
That's where Google Tag Manager (GTM) custom event listers come in. GTM lets you manage various website tags, including those for tracking HubSpot forms, without editing your website code directly.
If this guide doesn't sort out your Hubspot tracking form issues using GTM, then I don't know what to tell you; maybe it's time you pick a new career path.
Laying the groundwork with a custom listener
As I mentioned earlier, GTM with standard event listeners is completely tone-deaf to your HubSpot form events, so you'll need to start by creating a custom Javascript variable that listens in for HubSpot's unique screams.
To set this up, you'll need to create a tag, head over to GTM and select a new tag:
- Create a Tag: Go to the Tags section and create a new tag (e.g., HubSpot Form Listener tag). Then select the custom HTML template and paste in the code provided below.
- Create a Trigger: In GTM, navigate to the Triggers section and either use the all pages default trigger or create your own page view trigger for all pages.
- Configure the Trigger: If you want to you can refine this further and set the trigger type to "Some Page Views" and choose "equals" in the conditions. Enter the unique URL of your HubSpot form's success page in the value field.
- Link the Trigger and Tag: In the tag configuration, choose the trigger you created in step 1 to fire the tag only on the success page.
script type="text/javascript"
window.addEventListener("message", function(event)
{ if(event.data.type === 'hsFormCallback' && event.data.eventName === 'onFormSubmitted')
{ window.dataLayer.push({ 'event': 'hubspot-form-success', 'hs-form-guid': event.data.id,
});
}});
script
Now that you have the event listener set up, feel free to test your form. You should see a new custom event called 'hubspot-form-success' firing upon successful submission.
Connecting a GA4 event tag
Now that GTM is aware of HubSpot's presence on the site, the next step is to connect a tracking tag to your custom event.
Here's how to set it up:
- Create a Tag: Go to the Tags section and create a new tag (e.g., a Google Analytics event tag). Add your measurement ID, then configure the tag with your preferred event name, IE "form_complete."
- Create a Trigger: In GTM, navigate to the Triggers section and create a new custom event trigger and add the condition "hubspot-form-success."
- Link the Trigger and Tag: In the tag configuration, choose the trigger you created in Step 1 to fire the tag only on the success page.
Managing multiple forms
If you have multiple forms across your site, you can differentiate them in a few ways.
If each form resides on a different URL, you can capture the page path and use that as your unique identifier.
- Start by creating a new look-up table variable
- Select page path as the input
- Then, add the page slug you want to track and the preferred output you want, IE branch_a, branch_b, etc.
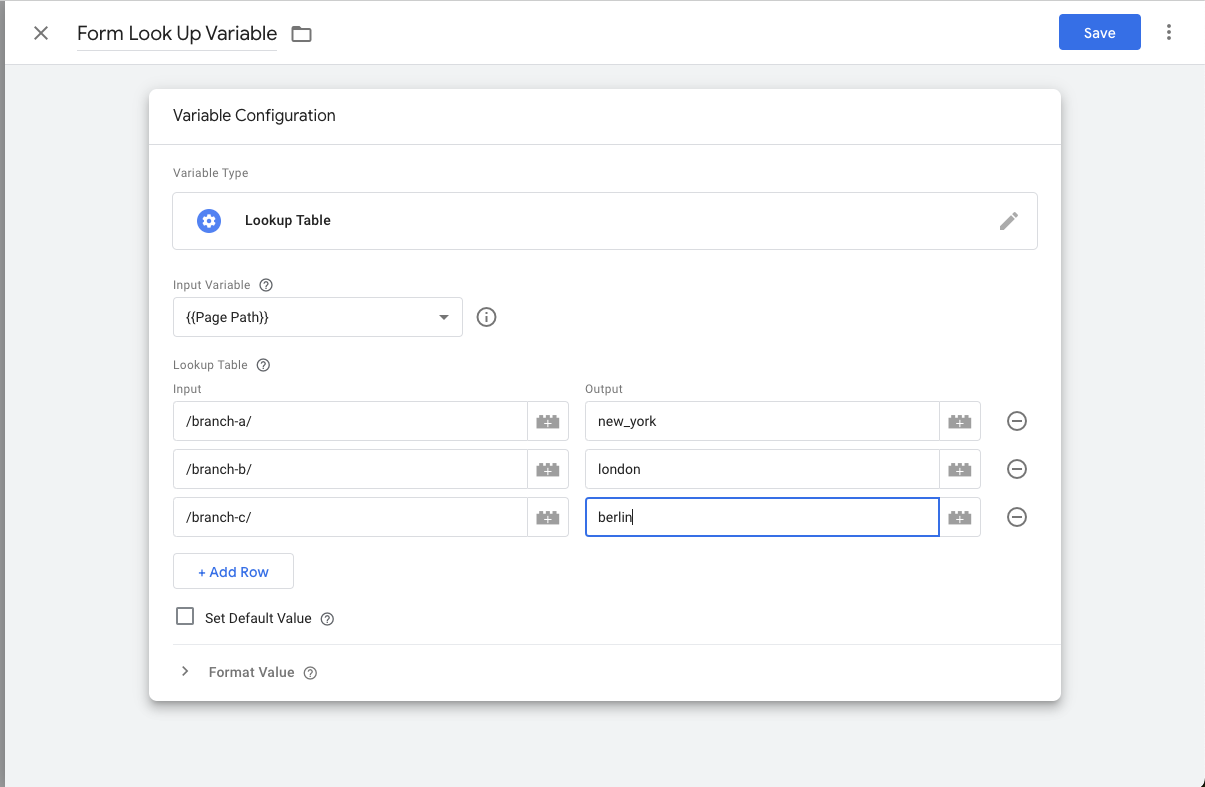
Page path lookup table in GTM
Then, head over to the Google Analytics tag you created for the form earlier and update it.
- Scroll down to event parameters.
- Select Add a parameter
- Give your partner a name
- Add the lookup table variable you created earlier to the value section and save.

Adding a custom parameter to a GA4 event tag
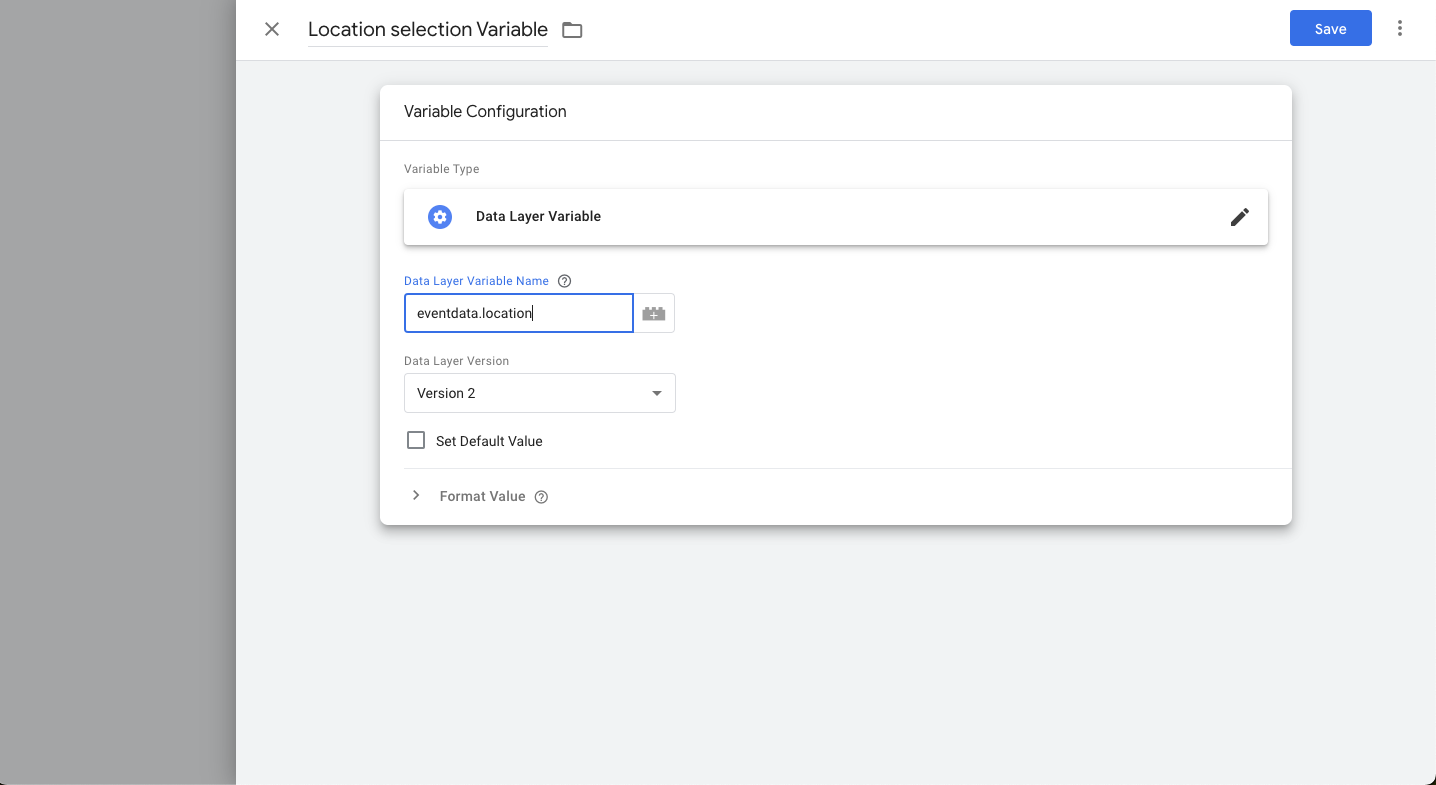
If you don't have unique URLs you can rely on, consider creating a Data Layer Variable in GTM to capture the specific form ID (found in the HubSpot form embed code) and send it along with the tracking event.
This allows you to differentiate between submissions from various forms; while the form_ID might not be descriptive enough, you can use the same method with the look-up table to replace the form ID with something more descriptive to pass through as a parameter when your form tag fires.
Utilising a Custom HTML HubSpot listener to capture more information
If you want to capture more information, such as form inputs, drop-down selections, revenue, or any other variables in the form, you can do so with the current listener you've installed.
The 'hs-form-guide': event.data.id should provide a structured list of information in your form. It's now up to you to capture that information and process the bits you want.
This method is more advanced but offers greater flexibility. It involves creating custom data layer variables to grab the information for form submission events. You can find detailed instructions and code examples on resources like
When you fire the form, check out the data layer provided by the GTM review tool.
It should return something like this:
event-data:
{ id: "50d7a2f4-35af-43de-9477-2f9508307a07",
type: "hsFormCallback",
eventName: "onFormSubmit", data:
[ {name: "firstname", value: "test"},
{name: "lastname", value: "test"},
{name: "email", value: "email@email.com"},
{name: "mobilephone", value: "6155551212"}
If the data is in an object, all you need to do is call the object, so let's use it as an example. If you want to capture this value above, head over to GTM
- Select custom variable
- Select the custom data layer
- Give the variable a name IE "form ID"
- And add the object name "id"
- To match what is used in the data layer above, and save.
Now, head back to your Google Analytics tag for the contact form and add the new variable as a parameter.
Creating a custom data layer variable in GTM
Sourcing data in an array
If the data is in an array, you'll need to configure the data layer variable slightly differently; for this example, you want to capture the value of the first name, so I would call the object data, then add 0 as the first array position and then the item I wanted, which would look like:
- data.0.value
Note: This course is a bad example. You should not be capturing personally identifiable information and adding it to your GA, or your account could get flagged. Still, you can use this as an example to capture other data you're interested in passing on from your forms.
Track to your heart's content
Following these methods, you can effectively track your HubSpot form submissions using Google Tag Manager. This data will provide valuable insights into user behaviour and help you optimize your forms for better conversion rates.
I hope this article saved you a little time and one headache.
Go well, and safe tracking wiery traveller, and I wish you many happy conversions.
Contact us
If you want to know more about digital marketing or feel this entire GA thing is too much of a bother and you need it sorted by experts, then we’re happy to assist. Simply contact us, and we can sort out your data migration for you.
Are you looking to promote your business?
Business owners can create their free business listings on nichemarket. The more information you provide about your business, the easier it will be for your customers to find you online. Registering with nichemarket is easy; all you will need to do is head over to our sign-up form and follow the instructions.
If you require a more detailed guide on creating your profile or listing, we highly recommend you check out the following articles.
Recommended reading
If you enjoyed this post and have a little extra time to dive deeper down the rabbit hole, why not check out the following posts about Google Analytics?
- How To Track Social Sharing In Google Analytics
- Get Back Your Google Analytics Account With These Simple Steps
- How To Properly Set Up Google Analytics With Shopify Sites
- Google Analytics Interaction Hit Vs Non-Interaction Hit
- How To Track Video Views With Google Analytics
- How To Track Search and Zero Search Queries In Google Analytics
Tags: Big Data, Analytics, Tracking
You might also like
Everything You Need to Know About SASSA Status Check
13 April 2025
Posted by Azhar Khanzada in Money Talks
A guide for 2025 for anyone looking to apply for a SASSA grant or would like to keep up to date with the status of your grant from application to red...
Read more
How Small Businesses Can Leverage Blockchain Technology
02 April 2025
Posted by Nicholas Tay in Money Talks
Unlock growth with blockchain! Discover how small businesses can use this tech for secure transactions, supply chain transparency and innovative solu...
Read more{{comment.sUserName}}
{{comment.iDayLastEdit}} day ago
{{comment.iDayLastEdit}} days ago