Recent posts
nichemarket Advice
What Is Search Everywhere?
06 April 2026

Constructive Criticism
How To Practice Sustainable Water Usage at Home
27 March 2026

Doctors Orders
What To Do When Your Denture Breaks?
25 March 2026

Get Court
Can a Rideshare Passenger Sue Both the Driver and the Company?
16 March 2026
Popular posts
Extravaganza
Trending Music Hashtags To Get Your Posts Noticed
24 August 2018
Geek Chic
How To Fix iPhone/iPad Only Charging In Certain Positions
05 July 2020
Extravaganza
Trending Wedding Hashtags To Get Your Posts Noticed
18 September 2018
Money Talks
How To Find Coupons & Vouchers Online In South Africa
28 March 2019
How To Set Up Floodlight Tags With Google Tag Manager
11 May 2018 | 0 comments | Posted by Che Kohler in nichemarket Advice
Digital marketing is becoming smarter and more complex by the day and with all the new tools available to us these days it can make work easier, once you've jumped over the initial set up hurdles, that is. Whether you're a digital marketer as an in-house or work for an agency the one thing many would try to avoid is setting up tracking, it's normally a long, painful process filled with debugging and complaining to developers.
Google has tried to make it easier by integrating its platforms into Google Tag Manager, but each tag does come with its own complications. Especially when it comes to Google's enterprize solutions like DoubleClick.
The power of DoubleClick lies in its Floodlight tag system and to make the most of this ad platform you need to have it set up correctly on your site, which has personally been a pain for me in the past.
What are floodlight tags?
Floodlight tags are conversion tracking system for the DoubleClick Digital Marketing (DDM) platform. Like other conversion tracking systems, it consists of tags that track activity on your site, along with reporting features for adding conversion data to your reports.
It uses a cookie to recognize repeat visits from a specific browser. Because all properties within the DDM platform—Campaign Manager (DCM), Bid Manager, and DoubleClick Search (DS)—can use Floodlight, you can use a single set of Floodlight tags to track conversions from both display advertising and search advertising.
This prevents cross-channel conversion funnels from counting conversions more than once (for example, conversions that start from a display click and end with a paid search click will give last-click credit to the paid search click).
So what's the difference between a Floodlight tag and a remarketing tag?
| FloodLight Tag | Remarketing Tag |
| A floodlight tag is an image pixel that is created within DFA and resides on the Advertiser’s webpage | A remarket tag is used to remarket or show ads to users who’ve previously visited your website as they browse the Web |
| List of users can only be utilized within DCM and DBM | Remarketing list is prepared which is used for showing ads |
| It allows advertisers to capture and report on the actions of users who visit their website after viewing or clicking on one of the advertiser’s ads | No such functionality remarketing tags can provide, they just help in targeting the right audience |
| They are of two types: Counter and Sales, the counter tag is used by an advertiser for capturing the activity of users while sales are used to capture specific information about a purchase | There is no type, one type of remarketing tag covers its functionality |
| Floodlight tag is the best way to know about your user activity or the effectiveness of the online campaign | Remarketing is a powerful way to stay engaged with your target audience. |
| There is no such division on users can be made. | You can divide users as per the sections of your website they shown interest, like gadget, fashion, sports, etc. |
| It cannot be used for creating audience list | With Remarketing tags you can develop a rich and detailed audience |
| It captures conversions associated with users that came in contact with your online campaigns, either by click or by an impression | It captures the user behaviour to retarget or remarket the user. |
| Floodlight tag is often used as a container for retargeting and confirmation pixels for publishers. | Remarketing tag also forms a pool of data to target the right audience as per remarket list |
For more on remarketing and retargeting check out previous posts here
How to set up floodlight tags with GTM
If you're not opting for the hard-coded route and have GTM installed on the site, you can use one of the following methods to get your floodlight tags firing.
Custom HTML method
- Open GTM
- Create a new tag
- Give the tag a name
- Select
tag configuration and choose custom HTML tag - Paste in the script
- Check the "Support document
.write " box - Select trigger
- Use the all pages trigger for a blanket rule or create your own exclusions based on your site needs
Tag template method
- Open GTM
- Create a new tag
- Give the tag a name
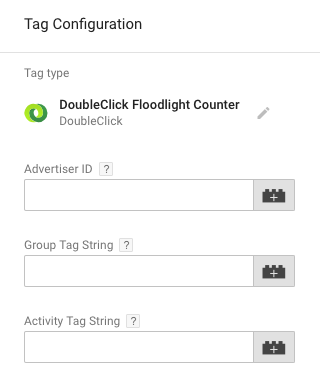
- Select tag configuration and choose DoubleClick Floodlight counter
You will then be presented with the following fields.
 Head back to your DCM console and grab the set up script.
<!-- Start of DoubleClick Floodlight Tag: Please do not remove Activity name of this tag: Guide to setting up Floodlight of the webpage where the tag is expected to be placed: https://www.nichemarket.co.za This tag must be placed between the <body> and </body> tags, as close as possible to the opening tag. Creation Date: 05/09/2018 -->
<script type="text/javascript"> var axel = Math.random() + ""; var a = axel * 10000000000000; document.write('<iframe src="https://1234567.fls.doubleclick.net/activityi;
src=1234567;type=nichemarket;cat=pqscbnpn;dc_lat=;
dc_rdid=;tag_for_child_directed_treatment=;
ord=' + a + '?" width="1" height="1" frameborder="0" style="display:none"></iframe>'); </script> <noscript>
<iframe src="https://1234567.fls.doubleclick.net/activityi;
src=1234567;type=nichemarket;cat=pqscbnpn;
dc_lat=;dc_rdid=;
tag_for_child_directed_treatment=;
ord=1?" width="1" height="1" frameborder="0" style="display:none"></iframe> </noscript>
<!-- End of DoubleClick Floodlight Tag: Please do not remove -->
From the example above your fields would look like the following
- Advertiser ID: 1234567 (This is the value of the "src=" parameter)
- Group String Tag: nichemarket (This is the value of the "type=" parameter)
- Activity String Tag:
pqscbnpn (This is the value of the "cat=" parameter)
- Select your counting method
- If you require standard variables, please add them or ignore for a basic set up
- Depending on your site you may need to fire the script with an image tag as opposed to javascript, toggle this feature if needed or check with your developer
- Select a trigger
- Use the all pages trigger for a blanket rule or create your own exclusions based on your site needs
Note: The Floodlight Sales tag will have the same initial setup however you will need additional data sent to capture unique parameters like revenue, order ID etc.
Leave the floodlights on
Now that you've jumped through the setup hoops there is hardly any reason to fiddle with it again, and you can safely create your campaigns with DoubleClick.
This is only an introductory set up of the tagging system. There are additional configurations available for more advanced users of the platform which I will tackle in future posts.
Contact us
If you want to know more about tracking solutions for your site, don’t be shy we’re happy to assist. Simply contact us
You might also like
A Guide To Mobile Trading Apps for South Africans
19 February 2026
Posted by Che Kohler in Money Talks
A guide to help you find apps to install on your Android or iOS device so you can start investing in stocks, bonds, forex, precious metals and Bitcoi...
Read more
Vendor Risk Management Solutions: Protecting Your Business in the Digital Age
15 March 2026
Posted by Abiola Oliyid in Alarming
Utilising automated platforms, continuous monitoring, and AI-driven analytics, vendor risk management solutions secure sensitive data and ensure comp...
Read more{{comment.sUserName}}
{{comment.iDayLastEdit}} day ago
{{comment.iDayLastEdit}} days ago