Recent posts

Constructive Criticism
How To Practice Sustainable Water Usage at Home
27 March 2026

Doctors Orders
What To Do When Your Denture Breaks?
25 March 2026

Get Court
Can a Rideshare Passenger Sue Both the Driver and the Company?
16 March 2026

Alarming
Vendor Risk Management Solutions: Protecting Your Business in the Digital Age
15 March 2026
Popular posts
Extravaganza
Trending Music Hashtags To Get Your Posts Noticed
24 August 2018
Geek Chic
How To Fix iPhone/iPad Only Charging In Certain Positions
05 July 2020
Extravaganza
Trending Wedding Hashtags To Get Your Posts Noticed
18 September 2018
Money Talks
How To Find Coupons & Vouchers Online In South Africa
28 March 2019
How To Import Your Refunds Into Google Analytics
08 February 2017 | 0 comments | Posted by Che Kohler in nichemarket Advice

Keeping track of all your data can become a cumbersome process, especially when looking at drawing data multiple platforms and tracking different stages of the buying cycle. Pulling reports from multiple sources can quickly become tedious and on top of that inconsistencies arise, requiring deep diving to answer simple questions. In the world of websites, data collection and interpretation is a key differentiator behind good sites and great sites.
Data can be intimidating in my personal experience and many site owners would sooner pass on the responsibilities to others or ignore it completely. But, it doesn't have to do be seen as such a painful task, if the collection is automated, stored correctly and maintained consistently it can be a dream. I've seen one traffic analyst be more effective and insightful than an entire BI team. Data is all the same to everyone until you get someone who can make sense of it.
While there is nothing wrong with using multiple tracking tools. I would always recommend using one platform for the majority of your data and reporting needs, it just makes life easier. You can pull quick stats, make faster decisions and stay ahead of trends and more importantly your competitors. So in the interest of the one tool rule, I've decided to tackle data importing into GA one topic at a time.
Importing Refund Data
One of the most painful and important transactions to keep track of, which many ignore is refund data. If your an eCommerce store, you will have to process a refund sooner or later. While GA is a great tracking and analytics tool it cannot capture every single action on your site, especially post-purchase actions and off-site actions but it doesn't mean it can't be done.
Using GAs enhanced eCommerce tracking you are able to drive refund data directly into your reports using a bit of javascript and setting up the hit types and calls. Be warned automating this process does his takes a bit of expertise and should be left to your development team. But fear not, all hope is not lost. If you can't wait for your tech team to figure it out or you're a startup with minimal resources you're in luck. We have 2 methods for processing refund data and sending them back into GA.
Google forms method
If you don't process many refunds partial and you it's more of an ad-hoc request, then we recommend this the singular form submission refund data method.
Step 1: Activate enhanced eCommerce reporting
Click on the admin panel of the view you're wanting to use, under the view column select eCommerce settings. Make sure enhanced eCommerce tracking is on and click submit.
Protip! You can also inlcude your eCommerce funnel here as an optional extra
Step 2: Download the GA refunder Google Form
Thanks to Julian at measure school who created this nifty Google form that can be synced to you GA very easily.
You can access the template here. Please make a copy for yourself
Step 3: Configure the Google App Script
- Click on more
- Click on editor
- Click on resources
- Click on current project triggers
- Click on 'No triggers set up. Click here to add one now'
- Make sure the settings state refund, from form, on form submit and click on save
- Click review permissions
- Click on allow
- Close app script window
Now you're all set up and you can now input your refund data directly into your Google analytics account. For a full breakdown on how to use the Google Refunder form, check out the measure school video
Google Spreadsheets method
If you have to process a number of refunds partial and full refunds within a week, then we recommend this bulk uploading of refund data method.
Step 1: Create a refund spreadsheet
Refund Data Import relies on the Transaction ID (ga:transactionId) to reverse E-commerce hits in your data. You can refund the full amount of the transaction or issue partial refunds. To issue a full refund, you only need to upload ga:transactionId.
The entire transaction, including all products, will be refunded using the originally reported product quantities, prices, and transaction revenue. To issue a partial refund, in addition to the transaction id you need the ga:productSku and ga
So in your Google Spreadsheet, the first header should use the internal dimension names (e.g., ga:transactionId instead of Transaction).
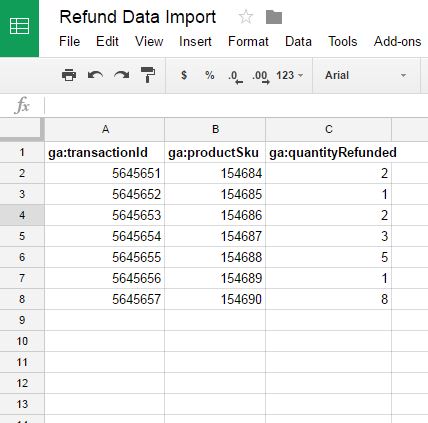
In the example below, we added three columns;
- ga:transactionId which is required.
- ga:productSku
- and ga: quantityRefunded which are also required for partial refunds.
Step 2: Create the Data Set through GA
- Go to the Admin panel of your GA account. Under the “Property” column, please select “Data Import”
- Click New Data Set
- Select Refund Data as the Type
- Define the Schema
- Save and then click “Get Custom Data Source ID (for API Users)“, copy the ID, will be using it later on
Step 3: Connect Google app script to your spreadsheet
- Once you have the data correctly formatted, it’s time to connect Google app script to your spreadsheet. Click tools then “Script Editor”
- Now, the script editor is open
- Delete any code in the script editor
- Paste the code below
function uploadData() {
var accountId = "xxxxxxx";
var webPropertyId = "UA-25xxxxx";
var customDataSourceId = "CAuCSza1SXCifs79teXIEl";
var ss = SpreadsheetApp.getActiveSpreadsheet().getActiveSheet();
var maxRows = ss.getLastRow();
var maxColumns = ss.getLastColumn();
var data = [];
for (var i = 1; i < maxRows;i++) { data.push(ss.getRange([i], 1,1, maxColumns).getValues()); } var newData = data.join("\n"); var blobData = Utilities.newBlob(newData, "application/octet-stream", "GA import data"); try { var upload = Analytics.Management.Uploads.uploadData(accountId, webPropertyId, customDataSourceId, blobData); SpreadsheetApp.getUi().alert("Uploading: OK"); } catch(err) { SpreadsheetApp.getUi().alert("Cannot upload: Failed"); } } }
Please note that you need to replace what’s in blue with your relevant data, the account id, the property id and finally the API id we generated in step 1 (above). Then, click “Resources” and choose “Advanced Google Services”
- Turn on the Google Analytics API
- Finally, try to run your script
A small window will pop up asking you to authorise permission to access your Google drive and Google Analytics. Once you do so, the data will get uploaded successfully to Google analytics as long as it’s in the correct format:- Now, you can schedule an upload to happen on an hourly, daily or weekly basis, Google will run the script and import the data exists your spreadsheet through their management API. On the other side, you should also agree with the team who is in charge of processing refunds to fill out this spreadsheet once a refund happens.
Once you’ve uploaded refund data, you can see it in the Sales Performance report. Please note that You cannot delete or modify refund data once it has been uploaded to your Analytics account. You bear sole responsibility for validating the accuracy of your refund data prior to sending it or uploading it to Analytics.
Keep track of your refunds
There you have it, two great ways to manage and track your refunds without any help from your software developer.
Contact us
If you want to know more about Google Analytics don’t be shy we’re happy to assist. Simply contact us here
Source: Google support Blog, Measureschool
You might also like

A Guide To Mobile Trading Apps for South Africans
19 February 2026
Posted by Che Kohler in Money Talks
A guide to help you find apps to install on your Android or iOS device so you can start investing in stocks, bonds, forex, precious metals and Bitcoi...
Read more
Rehab Your Knee: A Free, Evidence-Based Guide to Smarter Recovery
12 February 2026
Posted by Shamima Ahmed in Press Releases
Dhansay & Roberts launches Rehab Your Knee, a free ebook with evidence-based advice to help anyone recovering from a knee injury regain strength safe...
Read more{{comment.sUserName}}
{{comment.iDayLastEdit}} day ago
{{comment.iDayLastEdit}} days ago